Claim Review Screen
Support for ePrescriptions is currently available for Fred Dispense Plus sites. Any images with ![]() or any references to ePrescriptions are intended for Fred Dispense Plus sites.
or any references to ePrescriptions are intended for Fred Dispense Plus sites.
Electronic prescriptions (ePrescriptions) dispensed in Fred Dispense Plus are now supported in MedView Paperless. You will no longer need to print, scan and upload your ePrescriptions.
Any claimable ePrescriptions will now display in MedView Paperless with an 'e' icon.
![]()
When you select a script from the Scripts Panel, a table with the ePrescription details displays instead of a script image.
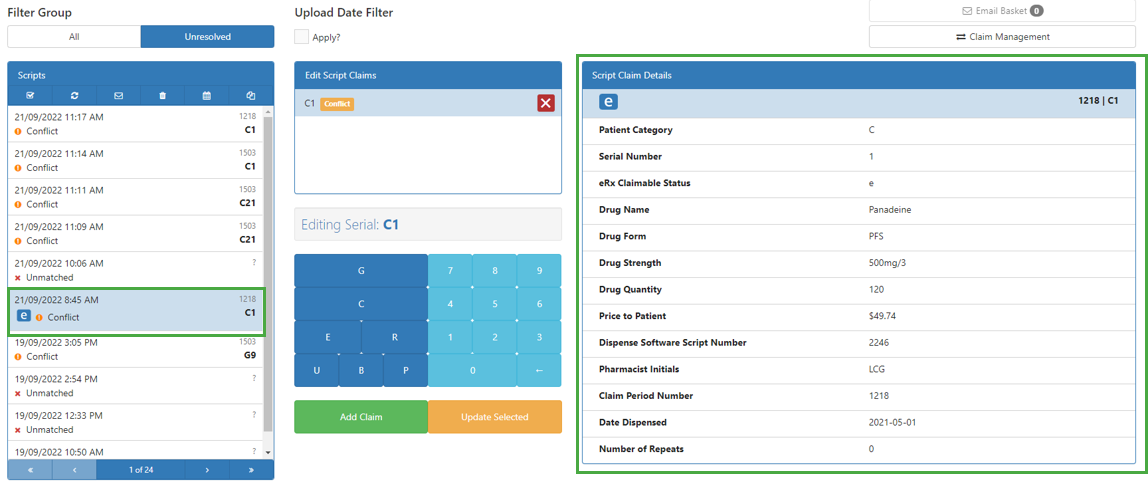
The Claim Review screen displays all of your scripts, across all claim periods, in the date order in which they were scanned.
Navigate to the Claim Review screen
From the MedView Paperless Dashboard, select one of the options under Review Scripts.

-
Unresolved Scripts: Displays only scripts that have a conflict or are unmatched.
- All Scripts in Scanned Order: Displays all scripts, both resolved and unresolved.
Refer to the Claim Review Reference table for a description of the numbered sections in each image.
Paper prescription

Electronic prescription

Claim Review Reference
| Number | Description |
|---|---|
| 1 | Click to return to the main Paperless screen. |
| 2 | Use the buttons to navigate between All scripts and Unresolved scripts. |
| 3 |
This list shows All scripts (or all Unresolved scripts) in the order in which they were scanned, from newest to oldest. The claim period of the selected script is displayed at the top of the list.
Select a script to view its image. The Toolbar buttons are specific to the selected claim. For more details, see Toolbar buttons If a script is in a locked claim period, a padlock icon is displayed next to the script. You cannot make changes to the script while the claim period is locked. For more details, see Lock or Unlock a Claim Period. |
| 4 |
To limit the scripts on the Claim Review screen to a single day, tick Apply?, then enter or select the date.
|
| 5 |
Displays claim serial numbers associated with the selected script image. You can enter a new serial number with your keyboard or the on-screen keypad. Then, select Add Claim to add the additional serial number to the script; or select Update Selected to overwrite the selected serial number. |
| 6 |
Click to open your Email Basket. This button is disabled if there are no scripts in your email basket.
For more details, see Email Scripts. |
| 7 | Click to switch between the Claim Management screen and the Claim Review screen (All Scripts in Scanned Order). |
| 8 |
Paper prescriptions: The selected script image.
Electronic prescriptions: Displays a table containing the details of the electronic prescription. |


Toolbar buttons
The Toolbar buttons are specific to the selected claim. The buttons change depending on your current view.

- Toggle Multi-Select: Click to select multiple scripts to perform actions on. Click again to return to single-script mode.
- Refresh: Refresh the script list to include any scripts added recently.
- Add to Email: Add the selected script(s) to your email basket. For details, see Email Scripts
- Discard: Discard the selected script(s) and clear all related claim data.
- Change Period: Select a new claim period to move the selected script(s) into.
- Mark as Duplicate: Use this if the image was scanned from the duplicate side of the prescription.
- Mark as Unmatched: Mark the selected script(s) as Unmatched.