Scan Scripts
Support for ePrescriptions is currently available for Fred Dispense Plus sites. Any images with ![]() or any references to ePrescriptions are intended for Fred Dispense Plus sites.
or any references to ePrescriptions are intended for Fred Dispense Plus sites.
Electronic prescriptions (ePrescriptions) dispensed in Fred Dispense Plus are now supported in MedView Paperless. You will no longer need to print, scan and upload your ePrescriptions.
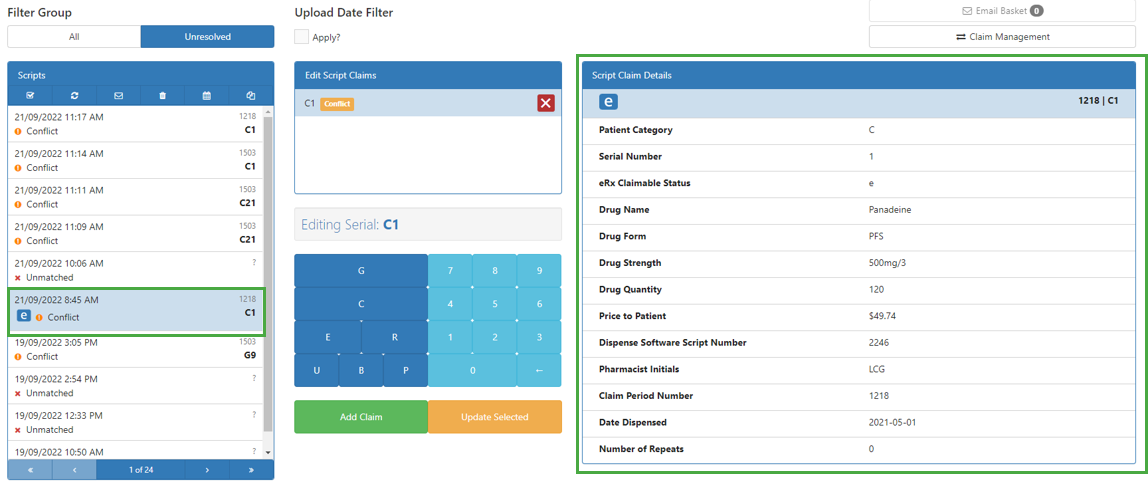
Any claimable ePrescriptions will now display in MedView Paperless with an 'e' icon.
![]()
When you select a script from the Scripts Panel, a table with the ePrescription details displays instead of a script image.
MedView supplies a Fujitsu ScanSnap iX1600 document scanner to MedView Paperless customers. You may also use your own document scanner, but we cannot guarantee that it will be compatible.
Basic scanning procedure
It's helpful to have MedView Paperless open during scanning, but not required.
Bundle up to 50 scripts from the same claim period, all facing the same way. Make sure there are no staples or paperclips attached.
- Load the scripts face-down into your document scanner.
- Press the blue button on the scanner, then wait 1-2 seconds for each script to scan.
When the PC attached to your scanner is connected to the internet, the scripts are uploaded as soon as they are scanned, and become available in your MedView Paperless webapp.
Scanning tips
Script types
- Authority scripts with the tear-off section attached: Generally, these are left attached and folded, stapled or taped to the back of the script. This will be detected as a duplicate. Accept the message that a multiple scan has been detected.
- Hospital and Doctor's Bag scripts are different sizes from other scripts. Scan them separately.
- Original handwritten scripts where the duplicate is the main part of the script and the signing section remains at the bottom: The signing section will be detected as a multiple scan. When a prompt is displayed to indicate that duplicates have been detected, tap Accept.
- Private scripts: Scan these scripts as well. They are not sorted, but they are part of the claim and must be retained for audit.
- Schedule 8/Dangerous Drugs: These are treated as any other prescription. State regulations may require the paper script to be retained.
When and how to scan
- Scan scripts only after they have been dispensed and signed. This is required for your records if you are audited.
- Scan at least once a day, so you can manage your claim as you go.
- Scan scripts in batches, rather than scanning each script as it is processed. This helps to avoid re-scanning scripts, by giving you time to notice and correct any script issues (for example, rejected concession cards).
- Bundle your paper scripts by date and time. This makes it easier to locate missing scripts, and prevents double scanning.
- Scan only one side of the script (face down). If you scan both sides, more scans are uploaded and more are rejected.
- Scan all scripts facing the same way. It doesn't matter whether your scripts are scanned top-first or bottom-first, but if they're all facing the same way, they scan faster.
- Remove any metallic object before scanning. Damage caused by clips or staples is not covered by the warranty.
Where to Install your Document Scanner
Depending on how your pharmacy operates, you might choose one of the following locations for your document scanner:
- Dispensary
- If your pharmacy dispenses a lot of nursing home scripts, it is easy for pharmacists to sign and scan them.
- If the pharmacist manages claims, scanning is most easily done from the dispensary.
- Scripts in/S3 counter
- Scripts can be scanned as patients sign and pick up their medication.
- Scanning scripts can be managed by a pharmacy assistant or dispense technician.
- Scanning doesn't hold up a dispense PC.
- The staff member can continue to assist customers in between scanning scripts.
- Tills
- Scanning can be done throughout the day by a sales assistant when there are no customers processing transactions.
- This works well at pharmacies where patients present their script along with medication at the till.
- Back office
- Scanning can be done away from the busy dispensary and front of shop.
- The scanner doesn’t take up valuable dispensary counter space.