
Configure your Store Settings
MedView Flow Pro
With storewide settings In MedView Flow, you can set up:
-
Pharmacy consent and delivery options to receive ePrescriptions from MedView Patient Connect as well as other patient apps and script ordering services. These will be sent directly to your MedView Flow Queue.
-
Pharmacy Notifications, for example, to receive email notifications of prescriptions submitted from patient apps. See Set up Pharmacy Notifications.
-
Healthengine Integration, so that appointments and vaccine bookings made via Healthengine will automatically flow through to MedView Flow.
-
MedView Chat so that patients can initiate a chat with your pharmacy. See Configure MedView Chat .
-
Docket Printing, so you can print out two dockets: one for the patient and one for the basket.
MedView Patient Connect
MedView Flow Pro
MedView Patient Connect (MPC) gives your pharmacy new options to receive ePrescriptions from customers directly into your dispensary workflow. ePrescriptions sent via patient apps and services or forwarded by patients via Email/SMS go directly into MedView Flow Queue in priority order.
For details about the patient order process, refer to Receive script orders from medication management apps and services
Pharmacy Consent and Delivery Option
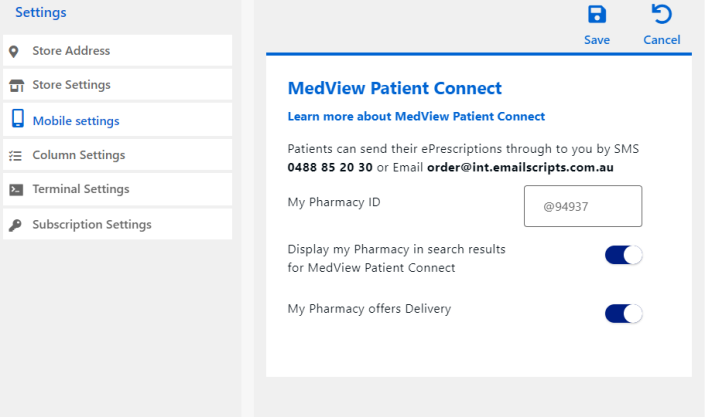
MedView Patient Connect is configured in Settings .
- Select the icon on the menu to display Settings.

-
Select Mobile settings.
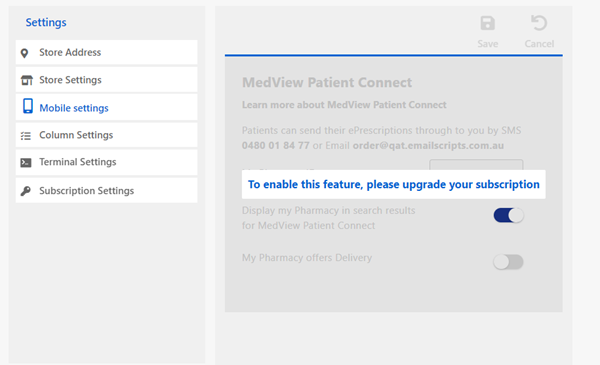
This feature requires a MedView Flow Pro or higher subscription. If you see the message below, and you want to use this feature, you will need to upgrade your subscription.
- Adjust your settings, as required.
By default, both settings are On.
- If you do not want to receive script orders forwarded from MPC, switch the toggle Display my pharmacy in search results to OFF. You can still receive ePrescriptions presented by patients visiting your pharmacy.
Patients using MPC can quickly search for your pharmacy by @mentioning the Pharmacy ID. For example: @99999.
- If you do not offer a delivery service, switch the toggle My Pharmacy offer a delivery service to OFF.
- If you do not want to receive script orders forwarded from MPC, switch the toggle Display my pharmacy in search results to OFF. You can still receive ePrescriptions presented by patients visiting your pharmacy.
-
Select Save to save your settings.
Set up Pharmacy Notifications
MedView Flow Pro
Pharmacy Notifications, for example, to receive email notifications of prescriptions submitted from patient apps, are configured in Settings.
- Select the icon on the menu to display Settings.
-
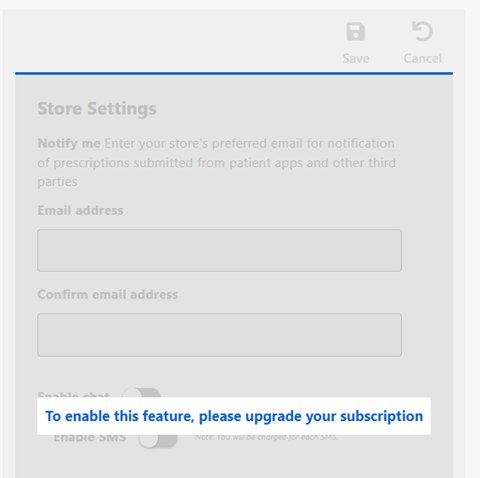
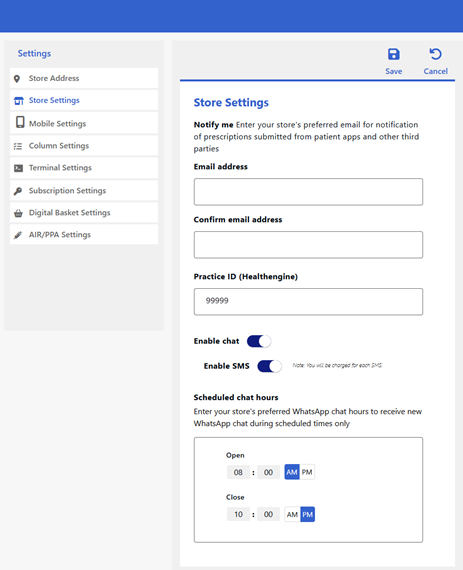
Select Store Settings.
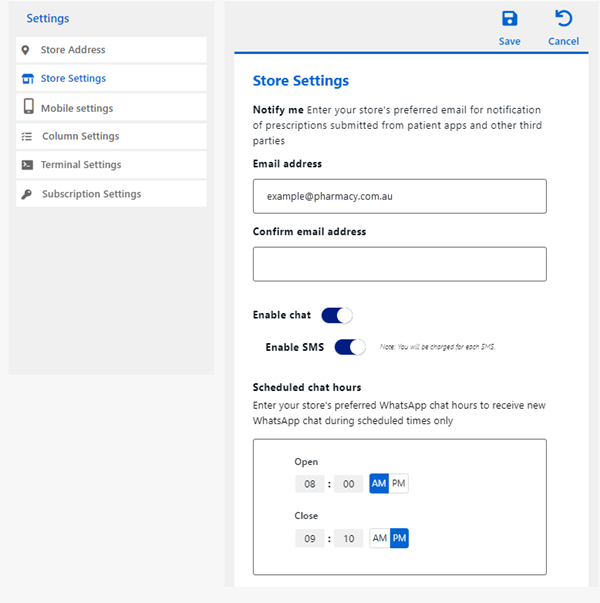
This feature requires a MedView Flow Pro or higher subscription. If you see the message below, and you want to use this feature, you will need to upgrade your subscription.
-
Enter your Email address.
-
Enter it again to Confirm email address.
-
Select Save to save your settings.
See also Pharmacy Notifications.
Set up Healthengine Integration
MedView Flow Pro
Contact Healthengine via the Fred Marketplace to obtain your Practice ID. This is required to connect Medview Flow to Healthengine.
- Select the icon on the menu to display Settings.
-
Select Store Settings.
-
Enter your Practice ID (Healthengine).
-
Select Save to save your settings.
Allow up to 10 minutes for this change to apply.
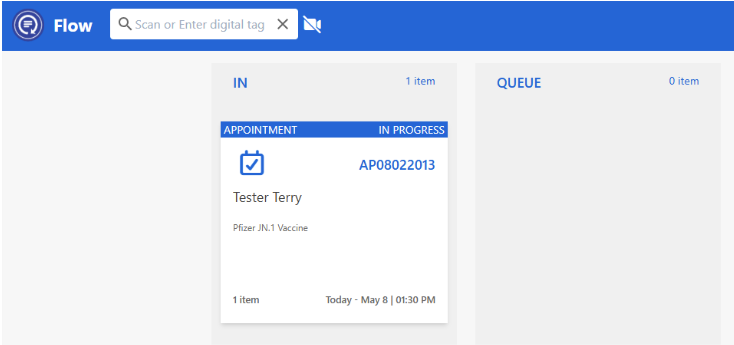
Once Healthengine is connected, appointments and vaccines automatically flow into Medview Flow.
The appointment time is included and displays in the IN column, where staff can process the appointment when it is due.
Configure MedView Chat
MedView Flow Pro
By default, MedView Chat is enabled for Fred Dispense Plus.
- Select the icon on the menu to display Settings.
-
Select Store Settings.
This feature requires a MedView Flow Pro or higher subscription. If you see the message below, and you want to use this feature, you will need to upgrade your subscription.
-
Ensure Enable chat toggle is set to ON.
Alternatively, if you want to turn MedView Chat off, change the toggle settings to OFF.
-
Ensure Enable SMS toggle is set to ON. With SMS enabled, you will be able to send SMS messages* to your customers.
SMS Chat is enabled by default for all sites with a MedView Flow Pro subscription. If you want to turn SMS chat off, change the toggle settings to OFF.
* SMS Chat messages sent by your pharmacy will be charged at $0.08 + GST per message.
-
Under Scheduled chat hours, select an Open and a Close time. You will be able to receive new WhatsApp chat messages from customers only during the specified time. By default, this is set to 9 am to 6 pm. In the example below, the opening time has been changed to 9:30 am.
The Scheduled chat hours are only applicable to WhatsApp chats.
-
Select Save to save your settings.
Configure Docket Printing
MedView Flow Pro
At the end of the Scripts IN process, you can print out two dockets: one for the patient and one for the basket.
Prerequisite: You need to have a dedicated docket printer installed. We recommend an Epson Thermal Receipt printer from the TM8xxxx range.
- Select the icon on the menu to display Settings.
-
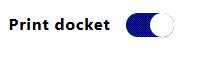
Select Store Settings.
-
Switch the Print docket toggle to ON.
-
Select Save to save your settings.
The information below is provided, so that you can install the printer yourself. However, if you need Fred to do the installation, there will be a service fee. See Fred Chargeable Service Fees in the Fred Help Portal.
-
Connect an Epson Thermal Receipt printer from the TM8xxxx range, to a dispense terminal with the latest Epson APD Driver installed.
-
From the Start menu, search and open Printers and Scanners.
-
Select the Epson printer and click Printing Preferences.
-
From the Feed and Cut tab, make sure the below options are selected / enabled.
Preset Option: Page [Feed,Cut].
Detail Option: Adjust the End of Page tab as shown below. All other tabs should be blank.
-
Feed to Cut position before cutting is true (checkbox is selected)
-
Cutting method: Cut
-
Feeding amount: 5.0 mm

-
-
Scan in a script.
-
At the end of the Scripts IN process, select Next or Add to Q.
When docket printing prompts, it will default to the Windows default printer.
-
Select the Epson printer.
-
Choose More Settings and deselect Headers and Footers
-
Click Print.